Tuesday, January 31, 2012

Marble Painting

Original Post: Play Create Explore

Our Story:
I sat down with my daughter at the table and taped a piece of paper onto a cookie sheet.  I squirted different colours of paint onto the paper and put some marbles onto the paper.  She rolled them around and created quite a masterpiece.  She even got her fingers in there a finished it off with some fingerpainting.

Verdict:
I'm not sure if it was the paint I used or what, but the marbles seemed to get stuck a lot.  The next time I were to try this I would maybe water down the paint so that the marbles moved easier.  And for sure make sure the kids are wearing paint shrits (or in our house, no shirts) because it can get messy if those marbles come flying off the cookie sheet.

Monday, January 30, 2012

Plans for the Week (January 30-February 5)

I just can't believe that we are getting into February!  January went by really fast!  I'm beginning to feel some pressure when making/doing some of these projects and I will choose my family first, so if there isn't something done every day, I appologize, but I will at least try and keep you posted on what I am doing towards an end goal.  For an example, I wanted to put some boxes in the storage room, but I need my husbands help and by the time we get the kids to bed, we're too tired.  But I'm/We're having fun and that's all the matters.

Week Five!

Valentines Day Decorating
Quickbread Gift
Marble Painting
Boxes in the Storage Room
Recipe of Some Kind

Saturday, January 28, 2012

Hot Dog and Spaghetti

Original Post: Unknown

Our Story:


I thought I would find the least healthy, gross looking supper around and this is what I got!  I'm half joking, but this was a super fun supper.  First I cut the hotdog lengthwise because I'm not as confident in my CPR as I should be.  Then I diced the hot dogs.  I gave the pieces to my daughter who stuck the spaghetti through the hotdog (three in each piece).


When she was done, I collected all the mini spider-looking things and threw them into a pot of boiling water.  Once finished, I added some spaghetti sauce and some veggies on the side and that was supper!

Verdict:
Both my kids loved this and I'm ashamed to say that I think they ate 2 1/2 hot dogs each.  Plus all the spaghetti.  Would I make it again?  Probably.  Would I make it once a week?  No.  Probably not even once a month.  MAYBE every 3 months, but that would be pushing it.

Friday, January 27, 2012

Car Garbage

Original Post: Better Homes and Gardens 

Our Story:
I know I'm not alone on this one, so I hope this can help some of you out!  At all times (I think they reproduce) I have dirty Kleenexes and food wrappers in the van console.  When I saw this, I was very excited!  I got my husband to bring me home a plastic container from work.  He cut a triangle shaped hole in the lid and I put in a grocery bag.  Presto.  Done.  Best garbage ever!


Verdict:
It never spills and I love having it in my van.  I put it in front of the passenger seat because usually no body is sitting there.  Word of advice though: Don't put garbage in it that will get moldy or start stinking up the van.

Thursday, January 26, 2012

Greeting Card Storage

Original Post: Simple Mom

Our Story:
I ALWAYS feel guilty throwing out greeting cards from Christmas/Birthdays/Annivsaries, but lets be honest - they are REALLY repetative and they do take up a lot of space.  But the special ones - like the ones from my parents or my brother that have beautiful words hand written inside - or the one from my grandma that she gave to me right before she passed away - or the ONE and ONLY anniversary card that I got from my husband this year for our 5th anniversary.  They are special.  But I just put them in my "box of treasures", never to be seen again.  Until now.


I went to Staples and bought a small binder and a package of small dividers.  When I sat down to make this little binder, I was scared because I had forgot to get a mini hole punch.  But I just improvised and used a single hole punch (I'll admit, it took longer, but it was cheaper than buying something that I'll never use again).


Verdict:
It doesn't hold as many as I first thought it would.  I may have to get a few binders (ONE for birthdays, ONE for anniversaries, etc.) but for now, I like that all my treasured notes/cards are in one place.

Wednesday, January 25, 2012

Bathroom Sign

Original Post: Peppermin Plum

Our Story:
I thought this was a really cute idea.  Decorate a boring door a little bit with a cute little boy/girl bathroom sign.  I knew that Michael's would be the place to check out, but I couldn't find JUST the boy and girl ANYWHERE.  So I picked up the big wood piece and that was all I needed.


Once I got home, I printed a template off the internet and used a, X-ACTO Knife to cut out the people.  One I had my stencil, I used black paint to make my two little people.  They didn't turn out perfect, but I love it anyways!

Verdict:
Two Things:
1) MAKE SURE YOU USE A CARDSTOCK OR OTHER THICK PAPER FOR THE STENCIL/TEMPLATE!  I used regular paper and that was why the edges didn't turn out as well.
2) In all honesty, I have not mounted this baby yet.  It's quite heavy, so we are trying to find a solution to our problem (the door is hollow).  We are REALLY close, I just need my husband to get out and find two small screws . . . I may end up doing that myself though this weekend.

Tuesday, January 24, 2012

Dry Erase Quiet Books

Original Post: I Am Momma Hear Me Roar

Our Story:
When we go to restaurants, we are those parents who bring in two bags of toys - one for each kid.  They are all quiet toys, but other than the books, they honestly don't keep them busy for that long.  When I found this idea, I thought it would be fantastic!  Then I thought - well, what's the difference between this and a colouring book with activities?  But I created them anyways.  It was super easy.  I got the binders again of Craigslist (1 inch) and I bought one for each child so they don't have to share and they can be personalized to the development of each child. 
Next I went through all of their colouring books and activity books and I started to rip out the pages I wanted (more activity pages, but a couple plain colouring pages).  After that, I went online to find even more activity pages.  This was the fun part!  I printed off what I needed then organized all the pages into two piles - one for my 21 month old and the other for my 4 year old. 

Then I put the page protectors into the binders and started to fill up the binders.  All I need now is some dry erase markers/crayons and we'll be set for hours minutes of fun the next time we go out to eat! 

And for a reference, here are some of the websites that I used to print from:
Kids Learning Station
Kids Sparkz
Preschool Learners
If you just type "Preschool Printables" (or toddler, kindergarten, etc.) into Google, you will get many more options!

Verdict:
I was originally thinking "What's the difference between this and a colouring book?".  I realize the difference now.  This can be adjusted to the individual child, I can keep the binder forever and I'm not just wasting money/paper for a couple pages.  Also, I am saving trees because the kids can do these pages over and over again.  And they will.  We have yet to go out to try these, but I will let you know how they work when we do!

Monday, January 23, 2012

Plans for the Week (January 23-29)

I'm back and I had a great vacation!  Obviously I didn't get anything productive done while I was gone, but I was busy this weekend and I have a few things that I want to share with you this week.  Plus there are some that I need some supplies from work to complete, so considering that it's Monday, hopefully I can get them finished tonight or tomorrow!

Week Four!

Bathroom Sign
Dry Erase Quiet Books
Greeting Card Storage
Boxes in the Storage Room
Recipe of Some Kind

Saturday, January 21, 2012

Baked Pasta

Original Post: Disney Family

Directions:
- Preheat oven to 375 degrees F. Spray a 9-by-13-inch casserole dish with cooking spray
- Boil pasta two minutes less than normal and set aside. Meanwhile, in a large bowl, mix together the cream, crushed tomatoes, basil, 1 1/2 cups of Italian cheese blend, and gorgonzola cheese.


- Add cooked pasta to the cream and cheese mixture. Stir to combine. Pour into prepared casserole dish and top with remaining 1/2 cup of Italian cheese blend. Bake for 30 minutes, or until top is browned slightly and pasta is bubbling hot. Serve immediately

Our Story:
First, I didn't want to make that many servings.  We are going on holidays soon and the less food I can have in my fridge/freezer while we're gone, the better.  So I cut the recipe in half and only used 1 1/2 cups of pasta (rotini).  That definitely was not enough - next time I would use 2 or even 2 1/2 cups for half the recipe.

I used pasta sauce instead of crushed pasta and it came out very runny.  Maybe this was because I didn't have enough pasta.  I also did not add the gorgonzola cheese and used Marble Cheese for everything instead.  To me, cheese is cheese.  Cheese is also expensive so I'm not going to buy all different types of cheese.  Unless it's parm or feta of course.

Verdict:
The kids LOVED this and I WILL be making it again but with some changes to the ingredients.

Saturday, January 14, 2012

Pizza Muffins

Original Post: Lick the Bowl Good

Directions:
- Preheat the oven to 375 degrees.
- Grease a 24-cup mini-muffin pan. In a large bowl, whisk together the flour, baking powder, Italian seasoning, salt and red pepper flakes (if using) ; whisk in the milk and egg.
- Stir in the mozzarella, Parmesan and pepperoni; let stand for 10 minutes.
- Drain, Mash and Mix in with the other ingredients
- Stir the batter and divide among the mini-muffin cups. Bake until puffed and golden, 20 to 25 minutes.
- Meanwhile, microwave the pizza sauce until warmed through. Serve the puffs with the pizza sauce for dipping

Our Story:
Our weekly grocery budget NORMALLY is $20 or less.  There are some weeks where things are on sale or we have coupons so we spend a little bit more and stock up the freezer, but for the most part, we only buy eggs, milk and fresh fruti and veggies plus a couple ingredients for a recipe.  So this being said, this was one of the recipes where we had everything in the fridge already because we had made homemade pizza a couple days before.

Verdict:
My daughter could smell the muffins right away and stoof by the stove and watched them cook.  Both the kids devoured the pizza muffins.  Both kids ate 4 muffins before I cut them off.

Friday, January 13, 2012

I Spy

Original Post: Kinderpendent

Our Story:
I did this activity on a rainy day with my daughter.  I just wrote down most of the ideas from the blog and because she can't read yet, I read aloud what she needed to find.  Looking back, I probably should have just put a picture beside each thing so help with those early literacy skills, but I guess I was lacking in judgement that day.

Verdict:
I don't know if she just wasn't into it or what, but she didn't leave the basement.  She just looked around and found something that fit the description and said "Here".  I don't think I would do this one again.  We have done more of a treasure hunt with clues that she enjoys a lot more and it gets her moving around the whole house.  That's fun to do on a rainy day right after naptime because I can set up while they are sleeping.

Thursday, January 12, 2012

Fine Motor Skills using Cheerios and Spaghetti

Original Post: Sugar and Spice

Our Story:
I originally pinned this activity to do with the kids on a rainy day.  More specific: A rainy day when daddy was at work, my son was sleeping and I just had my daughter to entertain.  Well, that was kind of how it all started.  My husband left for work and I was left with two crying kids that wanted him to stay.  My son was soon distracted by a book but my daughter needed to do SOMETHING.  So I grabbed some playdough, a raw spaghetti and some cheerios and let her have some fun. 


She was a pro at it, which I mostly expected.  So when my son came in, I thought I would let him have a try.  Mostly expecting HIM to eat all the cheerios.  But I was happily surprised when he was able to do it!  He focused, he tried, he failed and he succeeded.
Verdict:
What a great activity!  It is one of those activities that would keep my little guy busy for a LONG time - my daughter - not so much.  It was perfect for my 21 month old and I want to do it again and again with him!

Wednesday, January 11, 2012

Manual Collection

Original Post: Desiring Virtue

Our Story:
I really liked this idea.  Originally all of our instruction booklets have been stored in a file folder in our filing cabinet.  This is good, but there is no organization and it's really hard to find what you need without pulling out the whole folder. 


So I found some binders on Craigslist and started to work.  I even had a little helper.  We seperated the instructions into categories (Toys, Baby Stuff, Small Appliances, Large Appliances, Furniture, Electronics and Random Items). 


Next thing we did was put the page protectors in the binder (3 inch).  Once that was done, we started putting the booklets into each of the labeled page protectors.  And this even turned into a learning experience!  My daughter sorted each pile of booklets according to sizes.  So first we did the electronics.  She handed me the "big" ones first, then "medium" and lastly the "small". 


Verdict:
This was a quick, painless and easy project to keep ourselves organized.  WAY better than the filing cabinet but now I am unsure of where to put the manuals.  I'm thinking in the basement in the storage room on a shelf somewhere.

Tuesday, January 10, 2012

Glow Stick Bath

Original Post: FFFFOUND

Our Story:
My mom was actually the one that I got this pin from.  I thought that the next time I was at the Dollar Store I would pick up some glowsticks and try it.  But I was at Michaels one day and found these packs of 15 glow sticks for $1.50 and I couldn't resist.  Pretty good deal.  So I bought one pack and that night I threw three into the tub with the kids and turned out the lights.  My daughter loves baths, so this was something new and fun for her.  My son - HATES BATHS - but not this one!  He was so excited!  I think they played in the tub for about 45 minutes with these sticks, while I sat by the light of the hallway and read my book.

Verdict:
My kids ask for "Glow Baths" on a regular basis now. I went back to Michaels and bought 5 more packs. Best idea ever! Thanks mom!

Monday, January 09, 2012

Plans for the Week (Janunary 9-15, 2012)

I had a really successfull week last week!  I made so many wonderful, different things!  I have yet to share them all on here, well, because if I share everything at once then it will get a little boring!  So here are the things I plan on sharing/finishing this week!

Week Two!

Spaghetti, Cheerios and Playdough
Manual Collection
Recipe of Some Kind

Saturday, January 07, 2012

Slow Cooker Jambalaya

Original Post: Plain Chicken

Directions:
- In a slow cooker, mix the chicken, sausage, tomatoes with juice, onion, garlic, celery, and broth. Season with oregano, parsley, Cajun seasoning, cayenne pepper, and thyme.
- Cover, and cook 7 to 8 hours on Low, or 3 to 4 hours on High. Mix in cooked rice cook for about 15 minutes to warm through.

Our Story:
This was just as simple as the directions make it sound.  I made this on our crazy night (when we don't eat supper until after swimming lessons, which is about 6:30pm) and I followed it pretty much completely, just with some different seasonings.  Sorry there are no pictures.  It's hard to take pictures plus cook plus look after the kids plus clean the house all at the same time . . .

Verdict:
It turned out really well and both of the kids enjoyed it.  I can't say that they devoured it like they do chocolate cake, but they enjoyed it.  Not sure if I would make it again, however, it is a nice way to get some rice into our diet.

Friday, January 06, 2012

Labeling Chargers and Cords

Original Post: Just Something I Made

Our Story:
One night while my husband and I were watching TV I brought down our bin of cords (we don't have any chargers) and we went through them together.  There were SO many that we didn't know what they were for - but the ones that we DID know, we labeled.  There were also some that we were able to throw out because we don't own that electronic anymore (and haven't for 10 years).


To label each cord, I wrote on the right hand side of each label what the cord was for.  Then I removed the label and wrapped it around the cord.  This worked great.  For the one charger that we had, I wrote across the whole label and stuck it on one of the sides.


Verdict:
There are still a couple cords/chargers that weren't in the basket last night, and I plan on labeling those as well.  This was a great way to throw away the cords that we are not using any more.  It was also an eye opener to see just how many cords we have and from now on, as soon as a new cord/charger comes home we will label it right away.

Thursday, January 05, 2012

Bookmarks

Original Post: Altered to Perfection

Our Story:
So we are going on holidays in 8 days and I plan on taking a book with me to read.  I'm not a big reader, but I am part of a bookclub so that I can maybe get more into reading again (I use to LOVE reading as a kid).  Plus, bookclubs are a great social gathering - with ADULT conversation.  Not that I don't love the conversations that I have with my 1 and 4 year old, but come on . . .  Anyways.  I needed to make this bookmark because I honestly don't have one at my house and usually use flyers.  I'm ashamed.  I quickly put this together and I am very excited about how easy it was!  I just used a regular paper clip and some ribbon I had laying around, but it will work.


Verdict:
This was my first bookmark, but it will NOT be my last!   I can't wait to make some more with colourful paper clips and some nicer ribbon.  I plan on putting them in stockings next Christmas and giving them away as little gifts here and there.

Wednesday, January 04, 2012

Puffy Paint

Original Post: One Crafty Mumma

Directions:
- Combine 1tbsp Flour, 1tbsp Salt and a few drops of food colouring.
- Add some water to make a nice smooth paste
- Paint on a nice thick sheet of cardboard
- Microwave the design on high for 10 - 30 seconds until the paint puffs and it's all nice and dry


Our Story:
After the kids woke up from nap, we started getting together what we needed for the project.  You know how hard it is to find cardboard?  I mean, when I don't want it, it's all over my house, but when I NEED it, I can't find it for the life of me.  Finally, we found a diaper box a ripped off two of the top flaps.
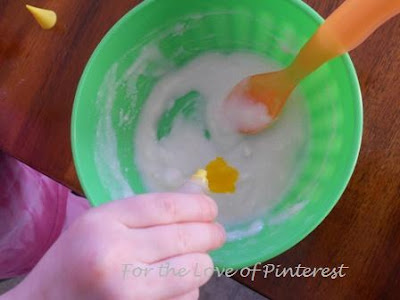
Next we started getting the paint ready.  This was a fun AND educational part of the activity.  I got some bowls down from the cupboard and we made paint the would match the colour of the bowl.  But we only had blue, yellow and red food colouring so my daughter learned how to mix and create different colours.


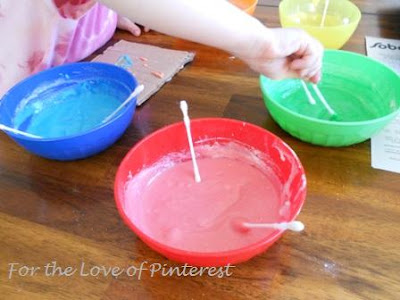
Finally, I used some cotton swabs for the painting.  Worked probably better than paintbrushes would just because of how thick the paste was.  My son wasn't really interested in it - he made one creation at the end - but he's only 20 months.  My daughter on the other hand, really enjoyed the project.


So ater creating each picture, I put each individually in the miccrowave for 30 seconds each.  I watched very carefully because I was nervous that something was going to start on fire.  There was a bad smell afterwards, but nothing started on fire.

Verdict:
It was a really fun activity and I think I would do it again on a rainy or snowy, cold day.

Tuesday, January 03, 2012

Plans for this Week (Jan.1-5)

I know it's already halfway through the week, but better to start than never!  Welcome to my blog!  I am using it as a way to keep myself accountable for the all the projects and not to let all the time I spend on Pinterest go wasted.  Every Monday I will come on here and let you know my plans for the week.  What's going on in my life and what projects I will be tackling.  So lets get started!

Week One!

Puffy Paint
Make Your Own Bookmark
Manual Collection/Organization