Week Eighteen!
Busy Bags. . . Week Five (last week, I promise)
Clothespin Magnets . . . Ways to hang pictures and papers on the fridge
Can of Dates . . .Cheap and Fun!
Pool Noodle Strining . . ."Mommy, what are you DOING?"
Monday, April 30, 2012
Friday, April 27, 2012
Update (April 2012)
Another update! Wow, it's been another two months, I think I will do a little update every couple of months so I can share with you how these projects are working out. If you have done any of these projects and your results are different than mine, please share a comment because every outcome will be completely different and I would love to hear from you!
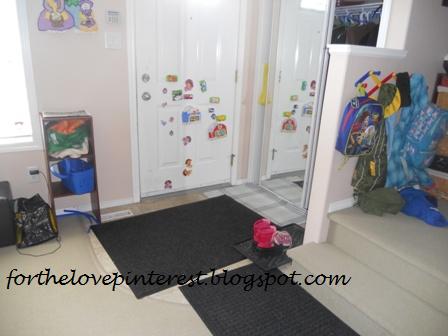
Front Entrance:
This continues to be a favourite of mine, the kids are still putting their stuff where it belongs (my daughter helps with my sons stuff some times) and it is keeping the landing a lot cleaner. Once the summer hits (come on summer!) I will be able to move the toques and mitts out and the hats and sunscreen in!
Disney Character:
We finally got the postcard back! The website said it would be a signed 8x10 picture of the princess she wrote to, but all we got was a postcard signed by all the princesses. Which my daughter loved anyways! Here's a picture!

Cords and Cables:
I have to just acknowledge this idea because last night and last week I was looking for the cords at the computer (one night for the mouse and one night for the monitor) and this idea REALLY helped that! I'm so glad I took the time to do this! SO GLAD!
Chore Charts:
We have been doing really well at keeping up with the allowance thing (except this weekend with Easter), and my daughter has been helping lots. She now knows exactly what she needs to do and this morning when she was setting the table she said, "Mommy, we're out of small spoons. I guess I need to empty the dishwasher!" What a smart girl!
Car Food Tray:
I love this idea! The kids have been doing really well with holding their tray and not spilling. It continues to keep the crumbs OFF the floor of the van (although you wouldn't know this by looking in my van), it keeps them quiet on the way to swimming lessons and allows me to focus more on the road than on passing food back to them.
Dress Up Station:
My husbands biggest concern about making this was that it would lead to a big mess every day and he would have to clean it up at the end of the night. This is NOT the case. It has taught my daughter how to hang things up with hangers and she actually does REALLY well with keeping it under control. The other concern was that my son would just pull everything OFF the hangers and this is also NOT the case. He doesn't really bother with it unless he is playing with his sister, then he asks her to get something for him. Best project he has made so far (I know, I say that about everything!)
Thursday, April 26, 2012
Basement Labels
Original Posts: I Heart Organizing, Better Homes and Gardens, Lily Jane Stationary
Our Story:
We have a bizillion and one toys in our basement and EVERY night we are left with cleaning up and putting things back where they go. his is really frustrating to me because my kids SHOULD know where things go. We have storage GALORE! But after cleaning up with them one day, I realized that maybe we had too MUCH storage and so many different cupboards and drawers and boxes that they had no idea what went where. So I sat down with them and we took pictures of all their toys. Once they were printed, we started to work labeling all the different baskets and shelves and cupboards. We still have not finished the entire basement, but we have a good start and the kids (even my two year old) are putting things BACK where they are SUPPOSED to be! There were three different ideas that we could have done. Just the picture, the words AND the picture or just the word. We went with just the picture because that would be easiest for everyone right now.


Wednesday, April 25, 2012
Old Dresser To Bench
Original Post: Junk Market Style (The original link did not work when I went to look at how they did this. But this link will take you to the home page and you can search for whatever you like from there)
Our Story:
I have always loved the idea of a bench at our front door so that people can sit down. We had the same problem with trying to find an old dresser as we did when we were making our daughters dress up station - so we shopped around and JYSK finally had a sale on these benches so we jumped on it. We put it together and attached it to the wall to make it a little sturdier and Voila! We now have a bench for people to sit on and put on their shoes. Here are the before and after pictures.


Tuesday, April 24, 2012
Three Week of Busy Bags Week Four
Original Posts: Make, Take and Teach. Quirky Mama,
Our Story: OK, so once I got making these games, I just couldn't stop. Well, I could if not for every time I went to find something for the kids I would find more and more ideas. The "Supper Games" idea has now turned into a breakfast and lunch - well, a "Meal Game" idea.
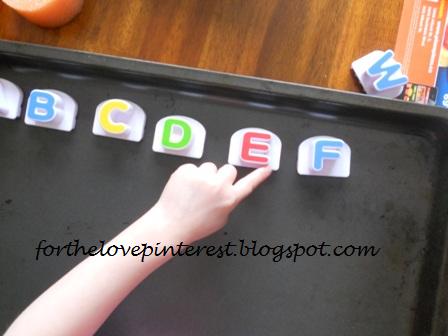
#10 - ABC Order
This was super easy. We have the magnet letters already on the fridge, so while she is sitting at the table, she can work on her alphabetic order. I just have to give her a cookie sheet and she does the rest. This was actually pretty comical - I have to share. After EVERY letter, she would loose concentration and have to start singing the song FROM THE BEGINNING. And sometimes we were laughing so hard at THAT, that she would forget where she was and have to over AGAIN! I think I heard the "ABC" Song nearly 50 times that day. I realized that for us, we can start at any letter and go from there. So I tried teaching her that and it worked. By the letter "P" she got the hang of starting off in the middle instead of the beginning. I also learned through this activity that my daughter has always thought it goes "L N M O P". What a great activity! Learning all over the place!

#11 - Toothpicks and a Shaker
The toothpicks were really easy to find. Dollar Store. I love that place. But the Parmesan Shaker? HA! Honestly, I looked at the Dollar Store, Walmart, Winners and finally found it at Home Outfitters. The thing I love most about these supper games is that they keep the kids busy during a really hectic part of our day and they are super cheap and easy to make!

Our Story: OK, so once I got making these games, I just couldn't stop. Well, I could if not for every time I went to find something for the kids I would find more and more ideas. The "Supper Games" idea has now turned into a breakfast and lunch - well, a "Meal Game" idea.
#10 - ABC Order
This was super easy. We have the magnet letters already on the fridge, so while she is sitting at the table, she can work on her alphabetic order. I just have to give her a cookie sheet and she does the rest. This was actually pretty comical - I have to share. After EVERY letter, she would loose concentration and have to start singing the song FROM THE BEGINNING. And sometimes we were laughing so hard at THAT, that she would forget where she was and have to over AGAIN! I think I heard the "ABC" Song nearly 50 times that day. I realized that for us, we can start at any letter and go from there. So I tried teaching her that and it worked. By the letter "P" she got the hang of starting off in the middle instead of the beginning. I also learned through this activity that my daughter has always thought it goes "L N M O P". What a great activity! Learning all over the place!


#11 - Toothpicks and a Shaker
The toothpicks were really easy to find. Dollar Store. I love that place. But the Parmesan Shaker? HA! Honestly, I looked at the Dollar Store, Walmart, Winners and finally found it at Home Outfitters. The thing I love most about these supper games is that they keep the kids busy during a really hectic part of our day and they are super cheap and easy to make!

Monday, April 23, 2012
Plans for the Week (April 23-28, 2012)
Week Seventeen!
Busy Bags . . . Week FOUR
Dresser to Bench . . . Not exactly
Toy Labels . . . Even my TWO YEAR OLD can do this
Update. . . What happened?
Busy Bags . . . Week FOUR
Dresser to Bench . . . Not exactly
Toy Labels . . . Even my TWO YEAR OLD can do this
Update. . . What happened?
Friday, April 20, 2012
Lego Pictures
Original Post: Pinky's Learning World
Our Story:
My kids have a LOT of Lego in the basement - so much that sometimes I think they are overwhelmed by all of it. They very rarely use it, even though they have a little table for it and it's frustrating, because part of me wants to get rid of it, but the other part of me says, "It's a great learning tool." So when I found this idea, I was SO excited to get started. During nap time one day, I went into the stash of Lego and started building simple structures. I started with about 8 and I figure if they really like the idea, I will make more elaborate ones, if they don't, maybe we do consider getting rid of them. I took a picture of each of my structures and then sent them off to Costco to get printed. Here are a couple of my creations.
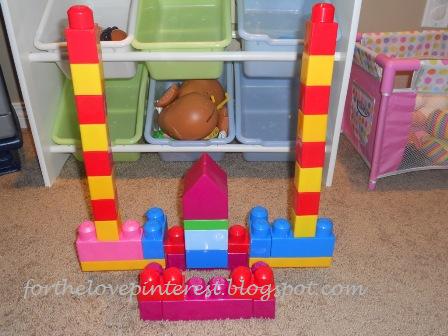
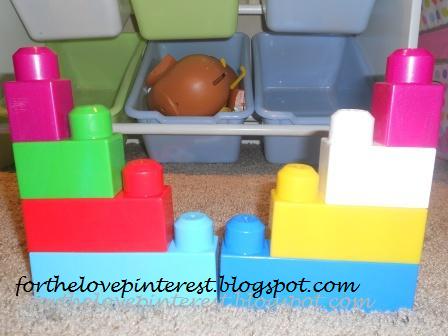
The Verdict:
At first, my daughter was really excited and wanted to build the structures with daddy. She lost interest really quick and hasn't touched them since, even with a little bit of pushing from me. I am not ready to get rid of the Lego QUITE yet, I will keep it around with the pictures until my son is a little older, but I realize that even something like this is not going to get my princess girly-girl interested in building.
Thursday, April 19, 2012
Mom's Birthday Present
Original Post: Fumaga
Our Story:
I loved this idea! My mom is a real sentimental person who loves her kids dearly and is truly proud of the way we grew up. She LOVES looking at old photos and is always saying how much my kids look like me and my brother or the things that they do remind her of us when we were kids. So for her birthday, I wanted to give her a present that would make her laugh and cry - at the same time. I bought the frame from Walmart. One frame, two pictures (4x6). Then when I was at her house one day, looking through photo albums, I spotted a couple of me and my brother and I took pictures of the scrapbook pages that they were on. I didn't know how good it would turn out, but I took them. Once I got home, I put the pictures onto the computer, cropped them and sent them to Costco for printing. I picked them up and almost cried myself. They were perfect. I couldn't believe that a picture of a picture CROPPED could turn out that good. The next time that my brother and I were at our parents house together, I showed him the idea and we got my dad to take a few pictures. Thankfully, my parents still have that old, brown chair in their basement and while we were taking pictures, mom was upstairs making supper so she had no idea what we were doing. We laughed so hard we were crying and we a lot of fun making this gift. And I got the EXACT result that I wanted - she laughed AND cried and it made my heart happy! Here are a couple of the pictures (I got them all printed and she can switch up the pictures whenever she wants) and the final gift is at the bottom.


Wednesday, April 18, 2012
Framed Maps
Original Post: Everything Fabulous
Our Story:
If you have some old maps that you don't know what to do with now that you have GPS, check out this idea! I didn't really do this because of that, because I didn't have any maps, but I did love the idea. There are three frames, one heart in each - where I met my husband, where we got married and where we spent our honeymoon. I just used Google Maps to print off each location and then cut out a heart shape. That simple! I had some extra frames sitting around because of all the ones I took off the wall for the Korea Collage. Otherwise, I would have just got them from the Dollar Store. Of course.


Tuesday, April 17, 2012
Three Weeks of Busy Bags Week Three
Original Posts: Mom to 2 Posh Lil Divas, Second Story Window, My Delicious Ambiguity, Home School Parent
Our Story: Here is the third installment of the supper games! I have some PDF's of the files that I made, so you can feel free to use them if you want. They were really simple to make and I can't wait to show them to the kids!
#7 - Number Match
Just print out the heart PDF below and then cut out 10 (or 20 in my case) hearts from construction paper. The reason I did 20 is because I made two different games, one for each kid. For my son, I just put the numerals on the coloured hearts. For my daughter, I put the WORDS. I don't have any pictures of my daughter playing this game, just because it was a struggle to try and get her to understand that letters spell things (obviously not QUITE there) - but matching numeral to numeral would be too easy.
Number Hearts
#8 - Brown Bear Match
The last link above will take you to the site that I got the printables from. There are some other ideas on her website, I encourage you to check them all out! This is a game JUST for my son and he loves it! He loves his animals and has great fun matching these ones. My printer is on the outs, so the colour isn't great, but it works for what we need right now! It was a little tough for him to put them right properly matching, but he got the idea and put the pieces beside each other for the most part.


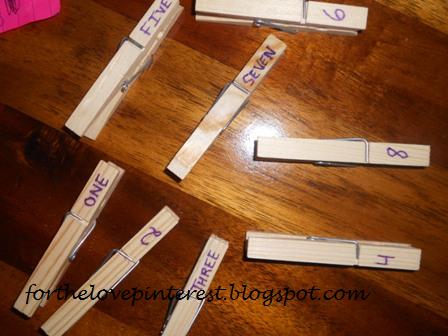
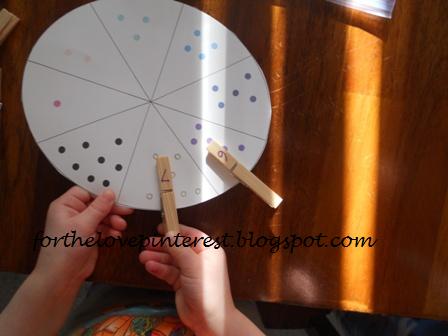
#9 - Number Wheel
Again, just print out he PDF below and then find 8 clothespins and write on them. I put numerals on one side and the written word on the other, just so that the game could work for both kids, but still only have 8 clothespins.
Number Wheel
Our Story: Here is the third installment of the supper games! I have some PDF's of the files that I made, so you can feel free to use them if you want. They were really simple to make and I can't wait to show them to the kids!
#7 - Number Match
Just print out the heart PDF below and then cut out 10 (or 20 in my case) hearts from construction paper. The reason I did 20 is because I made two different games, one for each kid. For my son, I just put the numerals on the coloured hearts. For my daughter, I put the WORDS. I don't have any pictures of my daughter playing this game, just because it was a struggle to try and get her to understand that letters spell things (obviously not QUITE there) - but matching numeral to numeral would be too easy.
Number Hearts
#8 - Brown Bear Match
The last link above will take you to the site that I got the printables from. There are some other ideas on her website, I encourage you to check them all out! This is a game JUST for my son and he loves it! He loves his animals and has great fun matching these ones. My printer is on the outs, so the colour isn't great, but it works for what we need right now! It was a little tough for him to put them right properly matching, but he got the idea and put the pieces beside each other for the most part.


#9 - Number Wheel
Again, just print out he PDF below and then find 8 clothespins and write on them. I put numerals on one side and the written word on the other, just so that the game could work for both kids, but still only have 8 clothespins.


Monday, April 16, 2012
Plans for the Week (April 16-21, 2012)
Week Sixteen!
Busy Bags . . . Week Three
Framed Maps . . . Where we were, where we began and where we went
Moms Birthday Present . . . Going WAY WAY Back
Lego Pictures . . . Copy that?
Busy Bags . . . Week Three
Framed Maps . . . Where we were, where we began and where we went
Moms Birthday Present . . . Going WAY WAY Back
Lego Pictures . . . Copy that?
Saturday, April 14, 2012
Zucchini Sticks
Original Post: King Arthur Flour
Our Story:
I was really excited/nervous to make these. I knew they would either go over really well, or the kids would have a hissy fit and that would be the end of the night. I'm not a mom who makes more than one meal - if they don't like what I make, they go hungry until the next meal (night time snack).
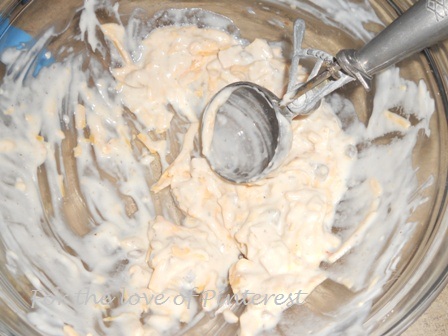
So the first thing I did was cut up the zucchini, sprinkle it with salt and let it start to dry. Then I made the dip. Everything going well - following the recipe. I finished the dip after about 20 minutes and it says to leave the zucchini for over an hour, but I am impatient, so I dried it off with a towel after only 20 minutes.
Then came the coating! After reading the warning on the website, I made sure that only one hand was getting wet in the eggs and I kept the other hand compeltely dry. It worked really well. And remember, only one zucchini at a time! I changed up the recipe here though. Instead of Panko, I used regular bread crumbs. And instead of grated parm, I used grated chedder. The bread crumbs worked great, the chedder cheese not so much. It just didn't mix nicely into the crumbs and then I was left with a bunch of cheese at the end (which I sprinkled over the sticks on the cookie sheet). Then I popped them in the oven!


The Verdict:
First, the dip. It sucked. It was gross and I'm not sure if I messed up somewhere in the recipe or what, but we did not use it! However . . .
With a little bit of ketchup, both my kids ate up the entire cookie sheet of zucchini sticks! I was so happy! That was all they wanted for supper! I myself (on a little bit of a diet) used hot sauce instead of ketchup, but I'm thinking I might make them again and use salsa!

Our Story:
I was really excited/nervous to make these. I knew they would either go over really well, or the kids would have a hissy fit and that would be the end of the night. I'm not a mom who makes more than one meal - if they don't like what I make, they go hungry until the next meal (night time snack).
So the first thing I did was cut up the zucchini, sprinkle it with salt and let it start to dry. Then I made the dip. Everything going well - following the recipe. I finished the dip after about 20 minutes and it says to leave the zucchini for over an hour, but I am impatient, so I dried it off with a towel after only 20 minutes.
Then came the coating! After reading the warning on the website, I made sure that only one hand was getting wet in the eggs and I kept the other hand compeltely dry. It worked really well. And remember, only one zucchini at a time! I changed up the recipe here though. Instead of Panko, I used regular bread crumbs. And instead of grated parm, I used grated chedder. The bread crumbs worked great, the chedder cheese not so much. It just didn't mix nicely into the crumbs and then I was left with a bunch of cheese at the end (which I sprinkled over the sticks on the cookie sheet). Then I popped them in the oven!


The Verdict:
First, the dip. It sucked. It was gross and I'm not sure if I messed up somewhere in the recipe or what, but we did not use it! However . . .
With a little bit of ketchup, both my kids ate up the entire cookie sheet of zucchini sticks! I was so happy! That was all they wanted for supper! I myself (on a little bit of a diet) used hot sauce instead of ketchup, but I'm thinking I might make them again and use salsa!

Friday, April 13, 2012
Easter 2012 - Part Two
Original Posts: Easter 2012 Part One
Our Story:
Activity #1: String Egg
This was a complete failure. The website tells you how to roll the balloon and wrap string around it, but does not give you the recipe for the liquid starch that they used. At the bottom in the comments it says you have to buy it. I thought I would look up a recipe online and use that. Well, that didn't work AT ALL! I have since then found a different recipe/activity on Pinterest (same idea) and I plan on doing that next Easter. Because I think it would be a lot of fun! But oh well, we learn from our mistakes. Some things work and some things don't. Whatever you do - don't mix cornstarch and water - or maybe we just didn't use enough cornstarch.


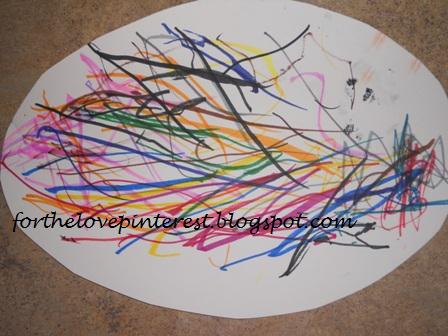
Activity #2: Family Fun Eggs
This was an activity that I made some changes to, but I liked the idea of decorating an egg with the kids. So I cut out an oval from cardstock and each of the kids made their own egg. My son used markers and made a beautiful rainbow any my daughter (from strips of construction paper) cut out small squares and made a collage. It was wonderful!


Activity #3 and #4 (S'Mores and Paint Chip Eggs) we didn't do because of lack of time. This is a busy time of year. But we did do some egg dying with the kids. Just regular colour on the eggs and then dye them. And we also did some wax eggs. First we shredded the crayons (use the big side of the shredder) and then we added boiling water to each cup. The water melted the wax and then we dipped the eggs in and brought them up through the melted wax. They turned out really neat, but I'm not going to lie - they were a pain to make - especially shredding the crayons.


And at the end of the day, we left out an egg and a cup of milk for the Easter Bunny (we were GOING to leave grass but old mother nature wouldn't allow us to with the 10 inches of snow we got the night before). The next morning, the kids had fun on their indoor easter egg hunt and couldn't wait to get to Easter Supper with the family!

Our Story:
Activity #1: String Egg
This was a complete failure. The website tells you how to roll the balloon and wrap string around it, but does not give you the recipe for the liquid starch that they used. At the bottom in the comments it says you have to buy it. I thought I would look up a recipe online and use that. Well, that didn't work AT ALL! I have since then found a different recipe/activity on Pinterest (same idea) and I plan on doing that next Easter. Because I think it would be a lot of fun! But oh well, we learn from our mistakes. Some things work and some things don't. Whatever you do - don't mix cornstarch and water - or maybe we just didn't use enough cornstarch.


Activity #2: Family Fun Eggs
This was an activity that I made some changes to, but I liked the idea of decorating an egg with the kids. So I cut out an oval from cardstock and each of the kids made their own egg. My son used markers and made a beautiful rainbow any my daughter (from strips of construction paper) cut out small squares and made a collage. It was wonderful!


Activity #3 and #4 (S'Mores and Paint Chip Eggs) we didn't do because of lack of time. This is a busy time of year. But we did do some egg dying with the kids. Just regular colour on the eggs and then dye them. And we also did some wax eggs. First we shredded the crayons (use the big side of the shredder) and then we added boiling water to each cup. The water melted the wax and then we dipped the eggs in and brought them up through the melted wax. They turned out really neat, but I'm not going to lie - they were a pain to make - especially shredding the crayons.


And at the end of the day, we left out an egg and a cup of milk for the Easter Bunny (we were GOING to leave grass but old mother nature wouldn't allow us to with the 10 inches of snow we got the night before). The next morning, the kids had fun on their indoor easter egg hunt and couldn't wait to get to Easter Supper with the family!

Thursday, April 12, 2012

Tuesday, April 10, 2012
Three Weeks of Busy Bags - Week Two
Original Posts: J Daniel 4's Mom, Second Story Window
Our Story:
The supper game idea has been going over really well in our house. Even my two year old wants to play the games, even though they are way too advanced for him. So my new focus is to find some activities that will be good for his age so that he can play along with his sister. So 1 our of 3 games are for him this week - the other two are for my daughter (and one day my son).
#4 - Ice Cube Stacking
This was not a Pinterest idea. This was a cleaning out the cupboards and found these lying around taking up space and needing something to do with them idea. I got them from the Dollar Store. I took them out of the original packaging, put them in a baggie and this is an activity that my little guy can do at the table. He can stack them, learn his colours and sort them into different piles.
PLEASE NOTE THAT THESE WILL BREAK IF YOUR CHILD CHEWS ON THEM WITH THEIR TEETH. ADULT SUPERVISION REQUIRED!

#5 - Nuts and Bolts
I love this idea! I went to Lowes and found 3 bolts, 9 nuts and 3 lock nuts. You have no IDEA how long this took me, standing there trying to find the right sizes (and a size that would be big enough to write on) - because they were out of one item in this size, and out of another item in that size and not available in whatever size. Frustrating. Word of advice, make sure you do NOT have the kids with you for this one. Once I had all my pieces, I took them home and wrote random letters on all the nuts, putting each of the vowels on the middle ones. I tried to use as many different letters as I could and have them all make sense, but that's going to be impossible. Make sure you have that lock nut to put on the end because with all the turning, you'll need to have that locked into place so you don't loose the pieces.


#6 - Weaving Pipe Cleaners
What a great idea for fine motor! I grabbed one of our cookie racks and a handful of pipe cleaners from the drawer and showed my daughter how to do the first one. She caught on right away and did a few by herself. She wasn't done when supper was ready, but she didn't want to take it apart, so we just put it back on our "Supper Games" shelf and it's waiting for the next time!

Monday, April 09, 2012
Plans for the Week (April 9-14, 2012)
Week Fifteen!
Three Weeks of Busy Bags. . . Week Two
Framed Artwork. . . No clutter, Beautiful Art
Anniversary Frame. . . My husband can never forget our anniversary now!
Easter . . . Part Two
Saturdays Recipe . . . Zucchini!
Three Weeks of Busy Bags. . . Week Two
Framed Artwork. . . No clutter, Beautiful Art
Anniversary Frame. . . My husband can never forget our anniversary now!
Easter . . . Part Two
Saturdays Recipe . . . Zucchini!
Saturday, April 07, 2012
Cheesy Chicken Enchiladas
Original Post: My Recipes
Directions:
- Preheat oven to 350°.
- Combine first 9 ingredients in a large bowl. Remove 1 cup chicken mixture; set mixture aside.
- Heat a large skillet over medium-high heat. Working with 1 tortilla at a time, brush oil over both sides of tortilla. Add tortilla to pan; cook 5 seconds on each side or until toasted and soft. Remove from pan; arrange 1/2 cup chicken mixture down center of tortilla. Roll jelly-roll style; place filled tortilla, seam side down, in a 13 x 9–inch baking dish coated with cooking spray. Repeat procedure with remaining 7 tortillas, remaining oil, and remaining chicken mixture. Spread reserved 1 cup chicken mixture evenly over enchiladas. Cover and bake at 350° for 20 minutes. Uncover; sprinkle evenly with cheddar cheese and green onions; bake an additional 5 minutes or until cheese melts

Verdict:
This really was delicious. The kids didn't care for it - but I think they were just not hungry, because they love all the things that are in them. One thing I didn't understand was why to keep out that 1 cup of filling, but I did and I'm glad I did. It really helped moisten the tortillas. Also, I added the cheese right away (not on purpose) and it was fine. And for an added kick - mommy added hot sauce onto hers before she ate it!
Directions:
- Preheat oven to 350°.
- Combine first 9 ingredients in a large bowl. Remove 1 cup chicken mixture; set mixture aside.
- Heat a large skillet over medium-high heat. Working with 1 tortilla at a time, brush oil over both sides of tortilla. Add tortilla to pan; cook 5 seconds on each side or until toasted and soft. Remove from pan; arrange 1/2 cup chicken mixture down center of tortilla. Roll jelly-roll style; place filled tortilla, seam side down, in a 13 x 9–inch baking dish coated with cooking spray. Repeat procedure with remaining 7 tortillas, remaining oil, and remaining chicken mixture. Spread reserved 1 cup chicken mixture evenly over enchiladas. Cover and bake at 350° for 20 minutes. Uncover; sprinkle evenly with cheddar cheese and green onions; bake an additional 5 minutes or until cheese melts


Verdict:
This really was delicious. The kids didn't care for it - but I think they were just not hungry, because they love all the things that are in them. One thing I didn't understand was why to keep out that 1 cup of filling, but I did and I'm glad I did. It really helped moisten the tortillas. Also, I added the cheese right away (not on purpose) and it was fine. And for an added kick - mommy added hot sauce onto hers before she ate it!
Friday, April 06, 2012
Easter 2012 - Part One
Original Posts: The Boutiqe Girls, Eclectic Recipes, Family Fun, Sweet Designs, Subway Art
Our Story:
We took down the St. Patrick Day decorations last week and brought out the Easter Decorations that we have. The bunny family was made for us last year by my grandma, she loves doing that kind of art, she has made us many things! And the decals - well, they're just from the Dollar Store! Last week we just used decorations that we already had in the house - plus we printed off an Easter Page for the 8x10 frame downstairs. I have put my web address across it a couple times, just because I don't want people copying the picture from me (it's not the best quality PLUS it's not mine), so I recommend going to my Pinterest Boards (Easter) and finding it there - it was uploaded by the user and there is a link above!
Once the house was decorated (see pictures below) it was time to get some ideas for the next couple weeks! The ideas above are the ones that my daughter chose from my Pinterest Board and we will be doing them in the couple weeks leading up to Easter. She's very excited!


Subscribe to:
Posts (Atom)